


Loading Journals
The upload journal buttons allow you to select the set of journals to be uploaded (Upload Selection) and initiate the Upload Process.
![]()
![]()
![]()
Upload Selection
Range
To load a range of journals or journal lines:
- Highlight the range by selecting one or more cells on adjacent rows (journal lines) to be uploaded. For example, in the below screenshot, four journal lines (rows 10 to 13) belonging to journal “J1” will be uploaded.
- Select the “Range” button.
Range Selection Example


Ensure that the selected journal lines are balanced.
Journal Wand does not support non-adjacent row selection. In the example, if rows 16 and 17 are selected in addition to rows 10 to 13, then only rows 10 to 13 will be uploaded and the non-adjacent row selection is ignored.

If there are attachments populated for the journal(s) in the range selection, provided the Upload Journal Attachments option is enabled, then all attachments for the journal are uploaded. In the scenario where there are more attachment rows for a journal than there are journal line rows, then all attachments are uploaded with the journal even if the range selection excludes some of the attachment rows.
Sheet
To load an entire sheet of journals:
- Select the applicable sheet.
- Click the “Sheet” button.
Workbook
To load all sheets in a workbook:
- Open the workbook.
- Click the “Workbook” button.
Pre-upload Checks
Template(s) Previously Loaded
Journal Wand checks if any of the templates have already been uploaded and displays a warning message should this be the case. One or more journals in the upload range with a status of LOADED, IMPORTED, IMPORT ERROR, AUTOPOST, AUTOPOST ERROR, APPROVAL or APPROVAL ERROR, indicates that the template may have been previously uploaded and the journals already interfaced to Oracle. The warning message is as follows:
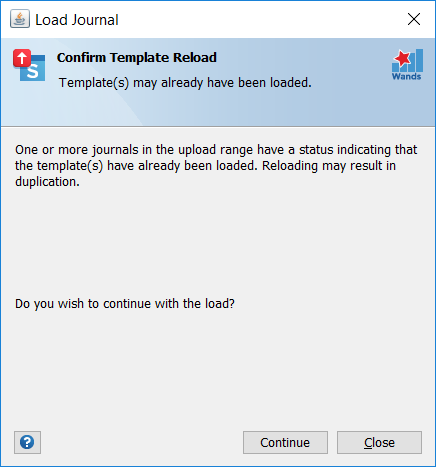
Click Close, if you do not wish to reload the journals, or click Continue to process the upload.
Unsaved Changes
If the option to attach the template workbook is enabled, and there are unsaved changes in the workbook, a confirmation message displays as follows:
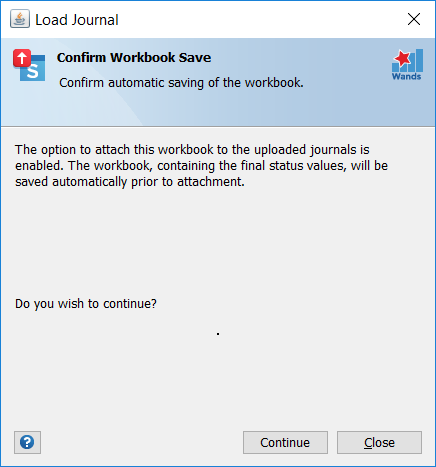
Continuing will result in the workbook being saved, so if at this point if you do not wish the active workbook to be saved, cancel the upload process. You can then manually save the workbook to another folder and/or file name, which can be used for the upload.
Upload Process
The process of uploading journals to Oracle consists of various possible stages, each of which is run depending on User Option settings and/or on certain conditions being met. The following table summarizes the stages, the condition for running each stage and the resulting change made to the Journal Header status:
| No. | Stage | Run When | Resulting Journal Header Status Change |
|---|---|---|---|
| 1 | Grouping of Journal Headers into Target Journals | Always | |
| 2 | Validation | Always | VALID (if journal is valid)
or INVALID (if journal is invalid) |
| 3 | Validation Summary | Upload Options = ‘Validate Only’
or One or more journals invalid |
|
| 4 | Load | Upload Options = ‘Validate and Load’ and all journals valid
or Upload Options = ‘Validate Only’ and Continue button pressed |
LOADED (if journal successfully inserted into the interface table)
or LOAD ERROR (if error occurred inserting the row into the interface table) |
| 5 | Submit Journal Import Request | Submit Journal Import option enabled | IMPORTED (if Journal Import request successfully submitted)
or IMPORT ERROR (if error occurred submitting the Journal Import request) |
| 6 | Upload Journal Attachments | Submit Journal Attachments option enabled and attachments populated in the upload range | |
| 7 | Submit Journal Approval | Submit Journal Approval option enabled and journal requires approval | APPROVAL (if journal approval workflow successfully submitted)
or APPROVAL ERROR (if error occurred submitting journal approval workflow) |
| 8 | Submit Journal AutoPost Request | Submit Journal AutoPost option enabled and journal eligible for AutoPost | AUTOPOST (if AutoPost request successfully submitted)
or AUTOPOST ERROR (if error occurred submitting the AutoPost request) |
| 9 | Monitor Concurrent Requests | Journal Import or Journal AutoPost requests are submitted | |
| 10 | Attach Template Workbook | Attach Template Workbook option enabled | |
| 11 | Process Summary | Always |
For more information on the available Journal Wand options, refer to Journal Wand User Options.
For a summary of the journal statuses and their meanings, refer to Journal Wand Messages.
1. Grouping of Journal Headers into Target Journals
Before validation can take place, the lines and headers defined on the template(s) in the upload range are grouped into “target” journals according to the same rules applied by the Journal Import request. One or more template headers may result in the creation of a single journal in Oracle and are grouped accordingly. All the lines comprising a target journal must be in balance in order to pass Validation.
For information on populating headers and lines on the template, refer to the Journal Headers and Lines section of the Populate Journal Wand Template page.
Journal headers with the same values for the following are grouped into the same batch in Oracle:
- Source
- Ledger
- Type (Encumbrance/Actual)
- Period
- Batch Name
Within each batch, journal headers with the same values for the following are grouped into a single target journal:
- Category
- Journal Name
- Accounting Date
- Conversion Type (only applicable to foreign currency journals)
- Conversion Date (only applicable to foreign currency journals)
- Conversion Rate (only applicable to foreign currency journals)
- Encumbrance Type (only applicable to encumbrance journals)
- Clearing Company
- Budget (only applicable to budget journals)
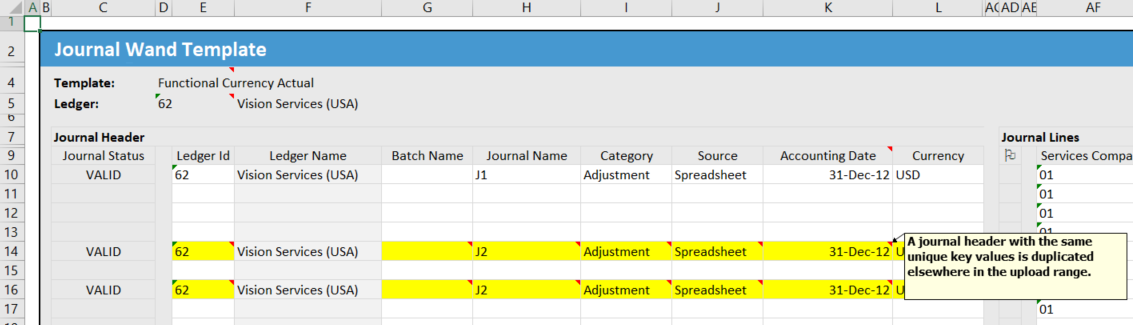
Template headers that have the exact same values in the above-mentioned key fields and/or which will be grouped into a single journal in Oracle, are highlighted on the template and a warning message is written as a comment in each of the key header fields. Highlighting the duplication may assist in troubleshooting journal imbalances.
Below is an example of the identification of duplicate journal headers on the template:
When grouping template headers into target journals, Journal Wand takes into account the value of the “GL Journal Import: Separate Journals by Accounting Date” profile option and whether or not the ledger is enabled for average balances. If the profile is set to “Yes”, or if the ledger is enabled for average balances, then journal headers with different accounting dates are always separated into different target journals (and resulting journals in Oracle). If the profile value is “No” and the ledger is not an average balances ledger, then journal headers with different accounting dates are grouped by period.
Journal headers belonging to the same target journal will have the same batch and journal name after upload is complete.
Line amounts are rounded according to the currency’s decimal precision setting before summing to calculate the target journal balance.
2. Validation
Validation is a two-step process. Firstly, the data is checked for data type compliance and thereafter each journal header and line is validated for compliance with the rules imposed by Oracle’s Journal Import program.
Step 1: Data Type Validation
If any of the journal field values violate the expected data type for that field, the following error is displayed:
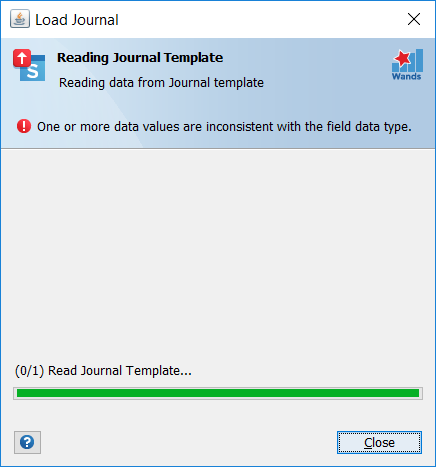
The incorrect cell(s) is highlighted in the template:
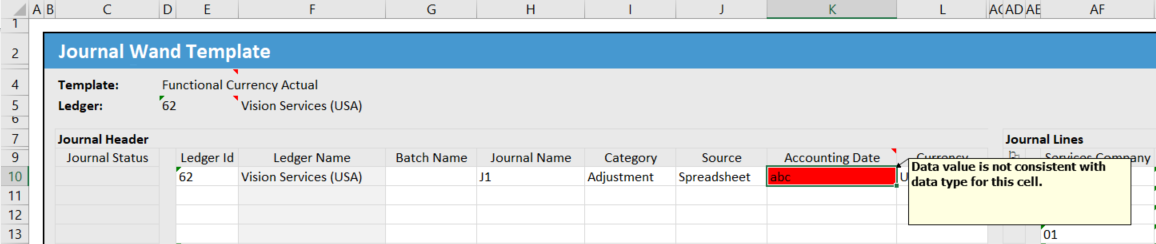
Data type violation errors must be corrected before the upload process will progress to the next validation step.
Step 2: Journal Rule Validation
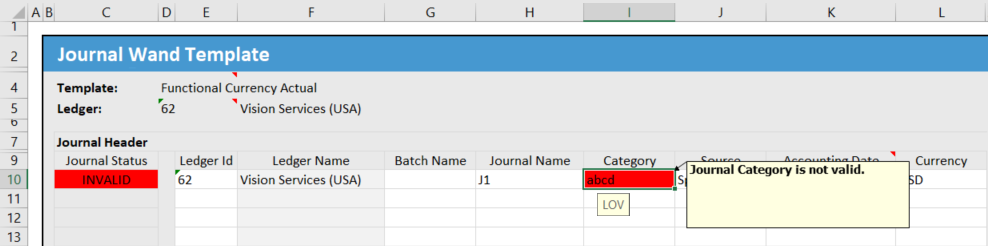
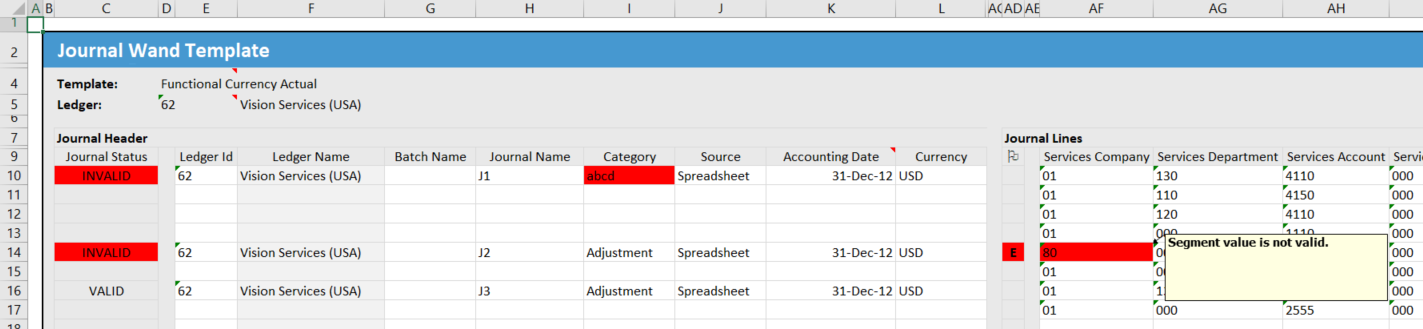
To ensure that each journal header and line successfully imports into Oracle, the validation rules enforced by the Journal Import program are checked for compliance at this stage. The journal header status is changed to VALID if the header is valid and all the lines associated with the header are valid. The journal header status is changed to INVALID if either the header is invalid or one or more of its associated lines are invalid. Any incorrect cells are formatted in red and a comment attached containing the error message. If a journal line is invalid, it is marked with an “E” in the Flag column.
Invalid Journal Example 1
Invalid Journal Example 2
For a summary of the journal validation messages and their meanings, refer to Journal Wand Messages.
3. Validation Summary
If any journals in the upload range are invalid or if the Validate Only upload option is selected, the process pauses and displays the validation summary:
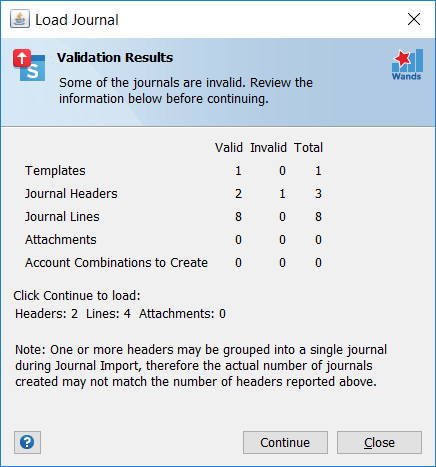
Provided one or more journals are valid, the option is given to continue. Clicking Continue progresses the process to the load stage. Clicking Close terminates the process and allows you to view and correct invalid journals.
4. Load
The load stage inserts the valid journal lines into the Oracle GL Interface table. The status of journals that are successfully inserted is updated to LOADED. If an error occurs while inserting a journal line into the interface, the status of the journal is set to LOAD ERROR.
The GROUP_ID value, populated in the GL Interface table, is constructed as follows: <last 9 characters of Oracle User Id><upload timestamp hhmmss>. This produces a unique, numeric value per Journal Wand upload (e.g. 1014804102016), thereby ensuring that multiple, consecutive uploads submitted by a single user, result in separate batches.
5. Submit Journal Import Request
Once all journals have been inserted into the interface, and if the Submit Journal Import option is checked, Oracle’s Journal Import program is submitted. On successful kick-off of the request, the status of journals linked to the request, is changed to IMPORTED. If an error occurs, either in the derivation of the parameter values for the Journal Import request or in submission of the request, the status of the linked journals changes to IMPORT ERROR.
After the successful completion of the Journal Import concurrent request, the following journal header fields are automatically updated in the Journal template:
- Batch Name
- Batch Description (if not specified by the user)
- Journal Name
- Journal Description (if not specified by the user)
- View Journal
The name and description fields are updated to align the values with the those in the journal created by Journal Import. This assists in locating the journal in Oracle after the import. The rules for deriving the field values are consistent with those applied by Journal Import.
The View Journal field is populated with an E4A_Drilldown function. When executed, the journal form opens in E-Business Suite with the journal displayed. If the responsibility has access to the Enter Journal function (GLXJEENT_A), then the Enter Journal form opens, else the Journal Inquiry form opens. If the responsibility has neither GLXJEENT_A nor GLXIQJRN function access, an Oracle responsibility-access error displays in the browser.
New account combinations will be created automatically by the Journal Import request, provided the configuration of the Chart of Accounts (Key Flexfield Structure) in Oracle allows for dynamic inserts. Journal Wand validates new account combinations and will allow a journal containing one or more new account combinations to be interfaced, provided dynamic inserts are allowed and any cross-validation rules defined in Oracle are satisfied.
If you wish to create summary journals in Oracle, enable the “Create Summary Journal” option. See Journal Wand User Options.
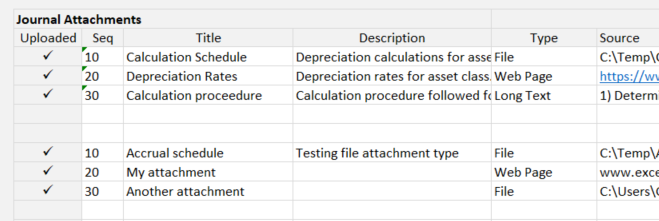
6. Upload Journal Attachments
If the Upload Journal Attachments option is enabled and journal attachments are populated on the template, then attachments are uploaded to Oracle after the completion of the Journal Import request. Journal Wand populates a check (tick) symbol in the Uploaded column for each successfully uploaded attachment, as shown in the below image:
Known Issue: After attachment upload, a check (tick) symbol should be displayed in the Uploaded column for each attachment successfully uploaded. However, in templates created before Wands version 5.14, a series of Wingding font symbols display instead. The reason for this is that the column is formatted as Text in pre-5.14 templates, and it needs to be formatted as General in order to correctly resolve the function now written to the column’s cells. To correct this issue, reformat the Uploaded column to General and save the template, which will correct the template for future uploads. Optionally, to correct it where it is currently incorrectly displayed, first format the column as General and then force recalculation of the formula in each affected cell by selecting the cell and pressing F2 followed by Enter.
7. Submit Journal Approval
If the Submit Journal Approval option is enabled, then the Oracle Journal Approval workflow is created and started for each journal requiring approval in the upload range. On successful submission of the approval workflow, the journal header status is changed to APPROVAL. If an error occurs in the submission, the journal header status is set to APPROVAL ERROR.
8. Submit Journal AutoPost Request
If the Submit Journal AutoPost option is enabled, the Program – Automatic Posting request is submitted, provided the responsibility has access to run this program and certain conditions are met.
Journals that require approval are not submitted for posting and their status remains as IMPORTED (if the Submit Journal Approval option is not enabled) or APPROVAL (if the Submit Journal Approval option is enabled).
If a journal is eligible for AutoPost, but the responsibility does not have access to run the program, then the status is set to AUTOPOST ERROR.
If a journal is eligible for AutoPost and the responsibility does have access to run the program, then its values are checked against the options configured for the “Wands Journal Wand” AutoPost Criteria Set. If the journal meets the criteria for posting, then its status is set to AUTOPOST on successful submission of the AutoPost request.
If the AutoPost Set doesn’t exist or if the journal doesn’t meet the criteria for posting, then the status is set to AUTOPOST ERROR. See AutoPost Journal Wand Journals for information on the set up of the AutoPost Criteria Set.
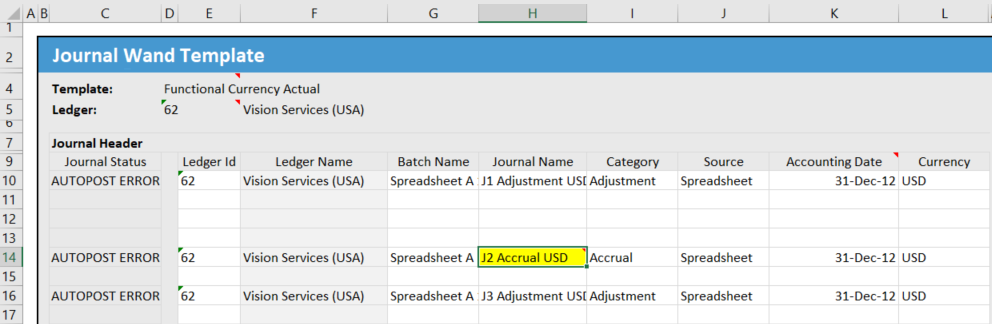
If an AutoPost Criteria Set does not exist for the journal values, then a comment is placed on the Journal Name of the specific journal header. Note that the entire batch, in which the journal is grouped, will not be submitted for auto posting and the status of all journal headers grouped into the batch, will be set to AUTOPOST ERROR.
In the example below, the journal header on row 14 has values which are not included in an AutoPost Criteria Set, therefore it is highlighted on the template. The status of all journal headers grouped into the same batch is AUTOPOST ERROR.
Journal Wand does not take into account the status of the period when submitting a journal for posting. If a journal is submitted for auto posting and the journal period has a status of “Future Entry”, then the status of the journal in Journal Wand is set to AUTOPOST, however the AutoPost request will not select the journal for posting, so the journal will remain unposted in Oracle until the period is opened.
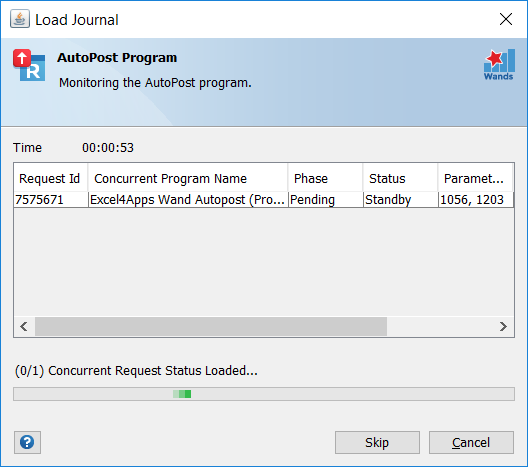
9. Monitor Concurrent Requests
The concurrent requests submitted by the process may be monitored during the upload process. Closing the dialog by clicking the X in the top right-hand corner of the window, or cancelling the dialog by clicking the Cancel button, will not cancel the concurrent requests which have already been submitted in Oracle. However, closing or cancelling the dialog may result in certain necessary Journal Wand process steps not being executed after completion of the request, and for this reason it is not advisable to close/cancel the dialog. A Skip button is visible when monitoring the AutoPost request, and may be clicked to safely skip past the monitoring of the request without compromising any post-request processing.
To monitor the requests outside of the load process, click on the Requests toolbar icon to open the Journal Wand Requests form.
10. Attach Template Workbook
If the Attach Template Workbook option is enabled, the active Excel workbook is uploaded to Oracle and attached to all the journals created by the upload process. Prior to uploading, the workbook is saved so that the attached version contains the final journal header statuses and batch and journal names, which are updated in the workbook during the process. Refer to Pre-upload Checks.
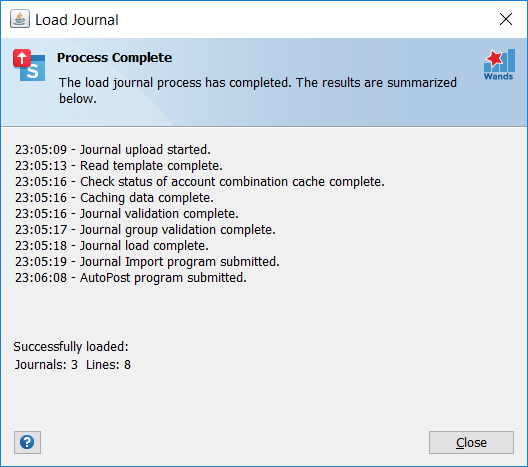
11. Process Summary
Finally, at the end of the process, a summary of the executed stages is displayed.
 If unable to load journals because of excessive account combinations, you may want to consider turning off the Cache Account Combinations configuration option. Doing so will disabled account combination validation on the journal line. Any invalid account combinations will need to be corrected in the GL Interface table.