


List of Values
The list of values dialog can be displayed in a number of places in the application:
- You click on the “Show List of Values” button when an Excel cell is selected which has been previously formatted as a special LOV cell using the List of Values – Create functionality.
- You click on the “Show List of Values” button when you are not in a special LOV cell. A list of values dialog will open showing the values for the currently selected item on the toolbar.
- A number of other dialogs will also use this list of values window as well.
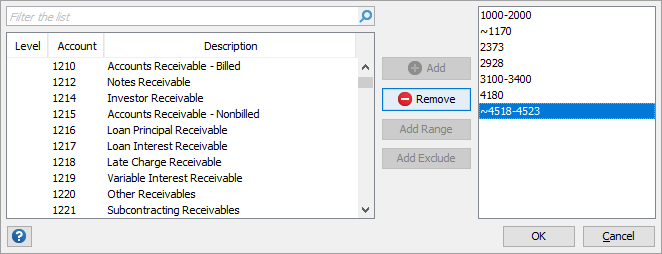
You can use the list of values as follows:
- Enter a value to search for in the filter panel. The list of values will be filtered to show only items that match the text you entered. The text entered will be compared to the value and description of the list. An item will be included in the results if either field contains the text entered in the filter panel.
- Click the “Add” button, double click an item in the list or press enter to add the current item to the selection list on the right. You can also click and drag an item to add it to the selection list.
- You can add a range like “1000-2000” as follows:
- Start by adding the “1000” value using one of the options explained above.
- Then find the “2000” value in the master list.
- Ensure that the “2000” value is highlighted in the master list and the “1000” value is highlighted in the selection list and click the “Add Range” button.
- You can also drag a value from the master list onto an existing value in the selection list to create a range.
- To remove an item from the selection list, ensure that it is highlighted and then click the “Remove” button or double click the item in the selection list and it will be removed. You can also click and drag an item to remove it from the selection list.
- If you want to include certain values and exclude others you can use the “Add Exclude” option. This will add the highlighted value to the selection list prefixed by the reserved exclude character (default is“~”).
Once you have added all the required values to the selection list click “OK” and the following will happen:
- If you started in a special LOV cell the results will be entered into the cell.
- If you did not start in a special LOV cell the results will be placed on the clipboard and you can paste them wherever you like.
- If you started on another dialog the results will be entered into the field where the list of values originated.